Synthetic vs Felt Roof Underlayment: Which is the Best Choice for Your Home's Roofing Protection?

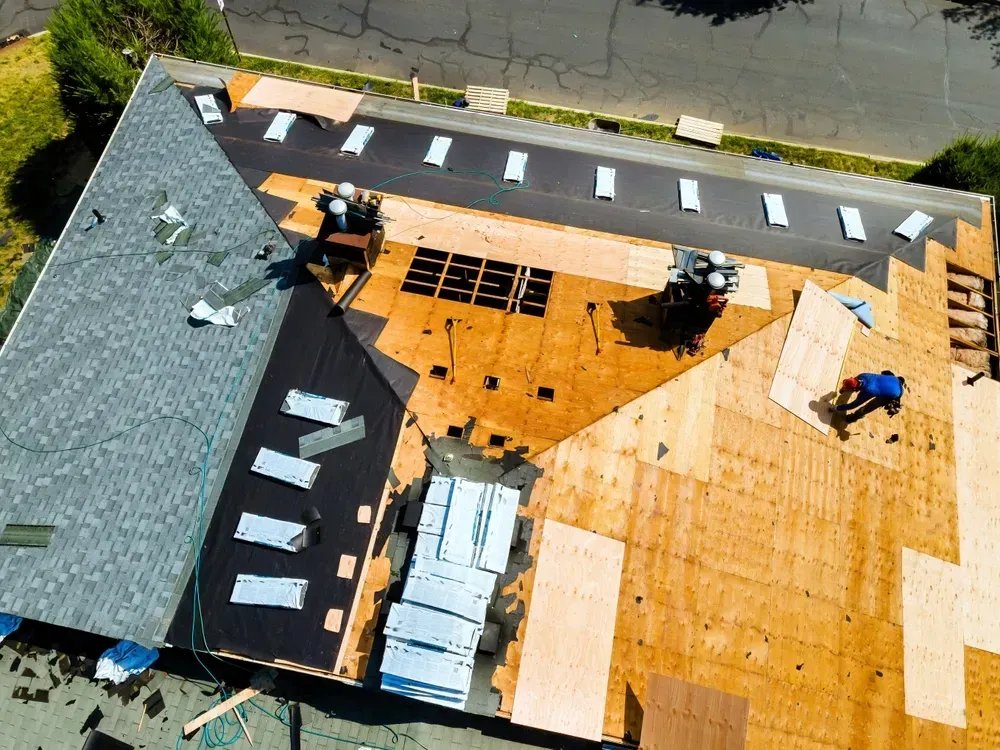
Your roof isn't just shingles—it's a whole system working together to protect your home. And underlayment is one of the most important layers. It sits right between your roof deck and the shingles, acting like a backup barrier against wind, rain, and moisture. Whether you're upgrading an older roof or starting fresh, choosing the right underlayment makes a huge difference. 


So what's the best underlayment for your home? This post breaks down the pros and cons of synthetic felt on roofs and traditional felt materials. We'll cover cost, durability, and which one suits your roofing goals. Let's dive in and find your perfect match.


What Is Roof Underlayment and Why Does It Matter?

Underlayment is that hidden layer most homeowners never see—but it’s doing a big job. It protects your roof deck from water if your shingles fail. It also adds extra wind resistance and shields against extreme weather.


If you've ever looked into
ice and water shields, that's another type of underlayment used in high-risk areas. But when covering your entire roof, most people choose felt underlayment or synthetic roofing underlayment.


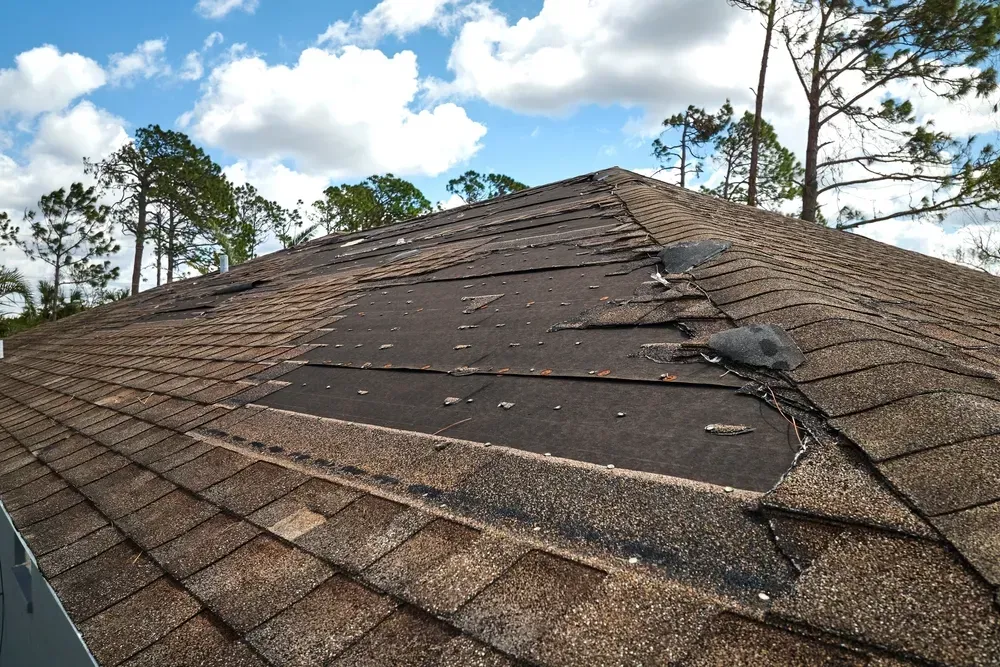
What Is Felt Underlayment?

Felt underlayment has been used for decades. It's made of a paper-like material saturated with asphalt. You'll usually find it in 15-lb or 30-lb rolls. The thicker the felt, the more protection it offers. It's affordable and works well on simple roofs. But it's heavier, can tear in high winds, and doesn't handle moisture like newer materials.


What Is Synthetic Underlayment?

Synthetic underlayment for roofs is the modern upgrade. It's made from polymers like polypropylene or polyethylene. These materials are lightweight, tough, and they're water-resistant.


Many professionals love synthetic shingles because they're easier to work with, especially on bigger roofs. They also hold up better under UV exposure and offer a cleaner finish under modern shingles like
3-tab shingles or architectural styles.


Key Differences Between Synthetic and Felt Underlayment

Feature

Weight

Durability

Water Resistance

UV Protection

Installation

Cost

Compatibility

Sustainability


Felt Underlayment

Heavier

Tears easily

Water-absorbing

Limited (1-2 days exposure)

More labor-intensive

Lower upfront

Standard roofs

Less eco-friendly


Synthetic Underlayment

Lightweight

Highly tear-resistant

Water-shedding

Extended (can last weeks exposed)

Easier and faster to install

Higher upfront, but better long-term value

Great for steep, complex, or large roofs

Some recyclable options available


When to Choose Felt Underlayment

Felt underlayment still has its place—especially when budget and tradition matter. It’s a solid option for homeowners who want a straightforward, affordable solution. Choose felt if:


  • You're on a tight budget
  • Your roof is simple with low slopes
  • You’re doing a quick repair or temporary cover
  • You want to match older roofing styles


When to Choose Synthetic Underlayment

Synthetic underlayment vs felt is all about performance. Synthetic wins when you want added strength, moisture resistance, and longer-lasting results. Choose synthetic if:


  • You live in a high-wind or rainy area
  • You’re replacing an older roof and want modern durability
  • You plan to install sectional gutters or advanced drainage
  • You’re doing a commercial roof repair project


Protect Your Roof with Your Local Experts

Do you want to protect your home every season? AMP Restoration and Roofing understands how much your roof matters, especially the roofing underlayment. We've helped homeowners find the right balance between cost, performance, and long-term protection.


We're your trusted guide when it comes to synthetic underlayment vs felt, and we'll ensure you get the results your home deserves.

GET A CONSULTATION!

You might also like

By Amp Roofing January 21, 2026
Measuring a roof looks easy, but it has its challenges. People often guess instead of doing the math, and that guess can cost real money during repairs or upgrades . Waste on extra shingles or short orders delays a project, leaves patchy colors, and strains the budget. This post solves that problem. You’ll learn how to calculate roof area with pitch in clear steps, pick the right tools, and check your answer with simple charts. By the end, you’ll feel confident ordering materials or speaking with a contractor. Keep reading to turn numbers into a solid roof plan. Why Roof Area Matters Roofing materials are sold by the square foot, so every square foot counts. Over-ordering raises cost, and under-ordering adds labor trips. An accurate area also lets you compare quotes with fair numbers. When you know the math, you can see if a bid pads material or labor. A true area figure can even impact insurance coverage and claims, as adjusters require proof. Gather Your Roof Data Tools Needed 100-foot tape or digital laser Sturdy ladder and shoes with grip Pitch gauge or smartphone inclinometer Notepad, pencil, and calculator Measure the Deck Sketch each roof section from the ground. Mark eaves, ridges, valleys, and hips. Measure the horizontal length and width of every rectangle or triangle. Stay on the ground when possible; use the ladder only for hard angles. Write numbers on the sketch right away to avoid confusion later. Use Basic Geometry First Start flat. Treat every roof section as if it were lying on the ground. Multiply length by width for rectangles. For triangles, multiply the base by the height and divide by two. Add all shapes together. This gives you the plan area, also called the footprint. Next, convert the plan area to square feet of covered surface. A flat roof needs no more math. Pitched roofs require an adjustment, and that’s where roof pitch degrees become crucial. Adjust for Pitch Roof pitch shows rise over run. A 6-in-12 roof rises six inches for every twelve inches of run. Builders often refer to this standard pitch for roofs on modern homes. Pitch changes the surface area because the slope is longer than the plan footprint. Convert Pitch to a Slope Factor Find your pitch with a gauge, app, or by placing a level and ruler on the roof. Turn the pitch into an angle. Use online charts that list roof pitch degrees for common ratios. For instance, a 6-in-12 equals 26.6°. Use the slope factor formula: 1 ÷ cos θ. For 26.6°, the factor is 1.12. Multiply the plan area by this factor. You now have true roof area. Check Common Pitch Scenarios “What is a 6 / 12 roof pitch?” You already saw it: a 6-inch rise over a 12-inch run, at 26.6°, with a factor of 1.12. Say your plan area is 1,800 ft². Multiply: 1,800 × 1.12 = 2,016 ft². Mention this aspect when ordering materials so suppliers know your slope. Low Pitch and Steep Pitch A roof with a pitch of less than 3-in-12 meets the low-pitch definition . These roofs shed water more slowly and need special membranes. They also have a smaller slope factor, so a plan area of 1,800 ft² with a 2-in-12 pitch (9.5°) uses a factor of 1.01, only 1,818 ft². Building codes may require enhanced underlayment any time a design falls into the low-pitch definition category. At the other end, an 11 12 pitch roof rises eleven inches per foot, angle 42.5°, factor 1.35. The same 1,800 ft² footprint becomes 2,430 ft² on the slope. Because walking on an 11 12 pitch roof borders on climbing, contractors often add safety costs to their estimates. Metal Roofing Pitch Transition Switching from shingles to metal often involves a transition from a shingle to a metal roofing pitch . Contractors may reduce the drop from 6-in-12 to 3-in-12 over a porch to match the style or improve drainage. Calculate each section separately, then add the totals. Mention metal roofing pitch transition during design so flashing and trim match both slopes. Remember that many builders treat a 6-in-12 as the standard pitch for a roof , so material quotes frequently default to that assumption. Double-Check Your Math Compare your total against satellite measurement apps. Re-measure key sections if numbers differ by more than 2 %. Ask a trusted roofer to confirm the area before ordering. Most will verify for free while preparing a quote. Accuracy here prevents waste, keeps schedules tight, and supports warranties. Roofing Expertise You Can Trust  AMP Restoration & Roofing knows roofs inside and out. Our team utilizes high-quality tools and on-site inspections to verify every square foot. We don’t guess; we prove. We then recommend materials that match your style, budget, and local building codes. The result is a roof that lasts, drains well, and boosts curb appeal. Clients stay informed at each step, from the first call to the final nail. That’s because we build the plan together, using clear numbers and easy language. Whether you’re curious about how to calculate roof area with pitch or want us to handle the job from start to finish, we’re here to help. Choose AMP Restoration and Roofing for precision and peace of mind! CONTACT US TODAY
Two-story house with gray weathered cedar siding
By Amp Roofing January 7, 2026
Discover the pros, cons, and smart alternatives to traditional wood siding. Learn why synthetic cedar shakes offer a timeless look with better durability.
Attic skylight. Asphalt Shingles House Roofing Construction with Attic Roof windows, skylights water
By Amp Roofing January 7, 2026
Thinking about replacing your skylights? Learn about the different types of skylight windows and expert tips for choosing the right replacement. See more.
More Posts

Book a Service Today